
How to Decorate a Red Velvet Cake?
Tips for Stunning Cake Decoration
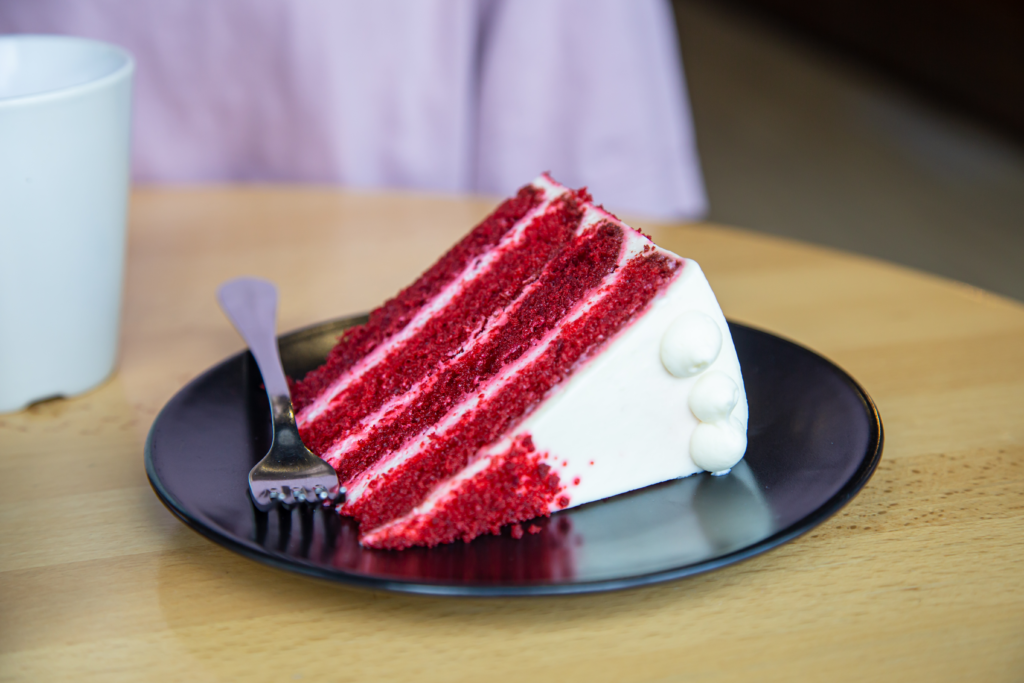
To create a stunning red velvet cake decoration, start with the best red velvet cake recipe that includes rich cocoa powder and the perfect amount of red food colouring. For a deep red colour, opt for gel food colouring instead of liquid, as it provides a more vibrant tone. Once your cake batter is ready, evenly distribute it into cake tins or 8-inch cake pans and bake to perfection. After cooling, you can layer the cakes with a creamy cream cheese frosting recipe or a luscious buttercream frosting for that classic flavour combination.
For an elegant finish, use a cake comb to create beautiful textures on the sides of the cake. Add a generous amount of frosting on the top of the cake, and consider decorating with fresh berries or edible flowers for a pop of colour. If you’re making red velvet cupcakes, pipe the frosting neatly and sprinkle some cocoa powder for added flair. Whether it’s for a birthday or a wedding cake, these red velvet cake decoration tips will ensure your delicious red velvet cake stands out beautifully!
If you want to experiment further, try using the red velvet cupcakes recipe for a delightful twist or whip up some red velvet brownies for a decadent treat. Don’t forget to make your own buttermilk for that authentic taste. With these tips, you’ll have your favourite red velvet dessert ready to impress at any occasion, whether it be an inch cake or a towering masterpiece!
What Ingredients Do You Need to Make a Red Velvet Cake?
To make a delicious red velvet layer cake, you’ll need a few key cake ingredients that come together to create the perfect texture and flavour.
Start with plain flour, which provides structure to the cake and helps it rise. You’ll also need sugar for sweetness and butter to ensure the cake remains moist and rich. To help the cake rise and become light and fluffy, include baking powder, which is a leavening agent that helps it rise as it bakes.
Next, eggs are essential for binding the ingredients together and adding richness to the cake. Buttermilk is another important ingredient, as it not only adds moisture but also gives the cake a subtle tang that balances the sweetness. A small amount of cocoa powder is used to give the cake a hint of chocolate flavour, without overpowering the other ingredients.
For the frosting, you’ll need cream cheese, butter, icing sugar, and vanilla extract to make a smooth and creamy topping that pairs perfectly with the red velvet cake.
When you combine these ingredients, you’ll have a delicious red velvet layer cake that’s sure to be a hit at any celebration!
Choosing the Right Food Colouring for Red Velvet
Choosing the right food colouring is important when making red velvet cake. To get that classic bright red look, you can use red gel food colouring or use liquid food colouring. Gel food colouring is thicker and gives a stronger colour with just a small amount. It’s a good choice if you want a bold red shade. Liquid food colouring is more common and easier to find, but you might need to use more to get the same effect. If you prefer a more natural red, you can also try natural colouring made from beetroot or other plant-based ingredients.
Importance of Cake Flour in Red Velvet Cake
Cake flour is an important ingredient when baking a homemade red velvet cake. It is softer and finer than plain flour, which helps give the cake a light and fluffy texture. Red velvet cake is known for being soft and tender, and using cake flour makes a big difference. If you don’t have cake flour at home, you can make your own by mixing plain flour with a bit of cornflour. This homemade version works well in a red velvet recipe. So, for the best results, always try to use cake flour in your homemade red velvet cake.
Choosing the Best Frosting for Red Velvet Cake: Why Cream Cheese Works
Choosing the best frosting for a red velvet cake is just as important as baking the cake itself. The most popular choice is cream cheese frosting, and for good reason. Its smooth, creamy texture and slightly tangy flavour match perfectly with the rich taste of red velvet. When you make the frosting, use full-fat cream cheese and real butter to get the best flavour and texture. Add a little vanilla extract and icing sugar for sweetness.
Before you frost the cake, make sure it is completely cool before frosting. If the cake is still warm, the frosting can melt and slide off. A frosted cake looks and tastes best when the layers are firm and cool.
If you have any remaining frosting, store it in the fridge in an airtight container. You can use it later for decorating cupcakes or spreading on biscuits. Some people also enjoy using the extra frosting as a sweet dip for fruit.
Cream cheese frosting is not only tasty, but it also spreads easily and holds its shape well, making it ideal for decorating. That’s why it’s the top choice for red velvet cake lovers everywhere.
How to Make Cream Cheese Buttercream for Decoration
Ingredients:
- 225g brick-style cream cheese (cold)
- 115g unsalted butter (softened)
- 500g icing sugar (sifted)
- 1 tsp vanilla extract
Instructions:
- Beat the Cream Cheese and Butter: In a bowl, beat the cold brick-style cream cheese and softened butter until smooth and fluffy.
- Add the Icing Sugar: Gradually add the sifted icing sugar, about 100g at a time, mixing until smooth.
- Finish with Vanilla: Mix in the vanilla extract and continue beating until fully combined.
- Use this Recipe to Make: Frost your completely cooled red velvet cake with this smooth buttercream. It pairs perfectly with cream cheese for a rich, tangy flavour.
Chill the frosting if it’s too soft for decorating, then enjoy!
Alternatives to Cream Cheese Icing
When looking for alternatives to cream cheese icing, consider using chocolate ganache or whipped cream frosting. For a delightful twist, pair the cake with a butter or sponge cake. You can make your own buttermilk substitute and use my red velvet recipe to achieve the classic flavour. For decoration, use gel food colouring for vibrant accents.
When you make the cake, use 8-inch cake pans and store the layers in the freezer for later. If your frosting is too thin, adjust with powdered sugar before frosting. Ensure a smooth, even layer of frosting for a beautiful finish.
How to Decorate a Red Velvet Cake Step by Step?
Decorating a red velvet cake starts with proper preparation. First, make sure the cake is completely cool before frosting. Use a serrated knife to level the top of each layer for a smooth finish. Place the first cake layer on a cake board or stand.
Preparing the Cake for Decoration
Brush away any loose crumbs and apply a thin crumb coat to seal them in. Chill the cake for 15–20 minutes to set the base before the final layer of frosting.
Techniques for Applying Cream Cheese Frosting
Use an offset spatula to spread the creamy frosting evenly. Start by covering the top, then work your way around the cake. Smooth the sides with a cake scraper. To finish, add decorative swirls, rosettes, or piping using the remaining frosting. If needed, chill the frosting slightly for easier shaping. Your cake is now ready to be served or further decorated!
What Are Some Creative Decoration Ideas for Red Velvet Cake?
Decorating a red velvet cake is a fun way to show creativity and add a personal touch. After layering and covering the cake with frosting, you can use a few simple techniques to make it look stunning. Start by trimming the first cake layer with a serrated knife to keep it flat. This helps when stacking layers evenly and adds to the classic red velvet appearance. Once you cover the entire cake, use decorative touches to make it stand out.
Edible Flowers
Edible flowers are a lovely way to decorate around the cake. They bring a natural and elegant look, perfect for birthdays, weddings, or special occasions. Choose fresh, food-safe flowers like pansies or violas, and gently press them onto the frosting. These add colour and charm without much effort.
Cake Crumbs
Cake crumbs are often used in classic red velvet cakes for texture and a neat finish. Save some crumbs from the trimmed layers and gently press them around the cake’s base or sprinkle them on top. This gives your cake a polished, bakery-style look.
Chocolate Garnishes
To add contrast, decorate with chocolate curls, shards, or drizzles. White or dark chocolate stands out nicely against red velvet and adds a touch of elegance. You can also create chocolate shapes to place around the cake or on top for extra style.
Conclusion
Decorating a red velvet cake is a rewarding blend of creativity and classic technique. From choosing the right ingredients to mastering the perfect frosting, each step contributes to a showstopping dessert. Whether you go for elegant edible flowers, rich chocolate garnishes, or a simple swirl of cream cheese frosting, your red velvet cake can be as beautiful as it is delicious. With these tips in your baking toolkit, you’re ready to impress at any celebration—whether it’s a single-layer treat or a multi-tiered masterpiece. Let your creativity shine and enjoy every slice of your stunning red velvet creation!